Author: admin

La Vignarola

La Vignarola

Nothing celebrates Spring vegetables in Rome better than this wonderfully versatile Roman dish, and it’s something I make often as soon as I see the artichokes in season.   I have only been making Vignarola since I moved to Rome, but it has quickly become 

Antico Forno Roscioli

Antico Forno Roscioli

Almost every ‘foodie’ that passes through Rome, will visit Antico Forno Roscioli . The family run bakery or Antico Forno Roscioli as it is known opened in Via dei Chiavari, by Marco Roscioli in 1972, and is one of the most successful bakeries in Rome.  (The location 

Turquoise Layer Cake

Turquoise Layer Cake


I’ve always loved seeing photos of sliced layer cakes that have graduating shades of colour in the layers and I’ve always wanted to make one.  I decided Annabella could help me, and I started by making a dose of a very basic madeira cake recipe I have.  This cake wasn’t really for anything or anyone,  but I was in the mood for a little experiment.  We divided the cake batter into 5 bowls and coloured 4 of them with various amounts of turquoise food colouring, leaving one without any colouring at all.  The problem was that I only had two cake tins of the size to use, and so the remaining batter had to sit and wait while two cake tins were in the oven.  By the time we baked the last cake, I noticed it came out crumbly and definitely not an ideal consistency for cake decorating.  I’m assuming it was sitting too long outside the oven, and should have been baked earlier, so my advice to you is that if you plan on making one of these cakes, make sure you have more than two cake tins.  (obviously it also depends on how many you can fit into the oven at one time). Otherwise, halve the recipe and bake in batches.

Turquoise Layer Cake

Basic Madeira Cake

  • 440g Self Raising Flour
  • 220g Plain Flour
  • 440g Butter
  • 440g Sugar
  • 7 Eggs
  • Food Colouring (I used Americolor turquoise)

Basic Buttercream

  • 340g Butter at room temp
  • 450g Icing Sugar
  • 1/2 teaspoon Vanilla Extract

layer18

  1. Beat the butter and sugar together until well combined and creamy.
  2. Add Eggs one at a time.
  3. Sift both flours together and add to cake mixture.
  4. Divide batter into 5 bowls, and using food colouring count the drops… adding more in the bowls where you want the colour to be more concentrated. To make the lightest pale greeny colour, I added a tiny teaspoon of batter from one of the other bowls with a strong turquoise colour.
  5. Add cake batter to prepared cake tins. (greased and lined on base with ovenproof paper). Bake at 180°C for about 30min for each cake.
  6. Remove cakes from tin, and allow to cool completely.
  7. When cool, level all cakes, ensuring they are all the same height.
  8. To make buttercream:
    • Beat butter with an electric mixer  until pale and creamy, about 2 minutes.
    • Add sugar, 1/2 cup at a time, beating well after each addition, about 5 minutes.  Add vanilla, and beat until buttercream is smooth. Use immediately, or cover and refrigerate for up to 3 days. (Bring to room temperature, and beat on low speed until smooth before using.)

  9. Stack cakes, filling each layer with white buttercream, and then cover entire cake with buttercream. (this adds to the ‘surprise’ when the cake is sliced and the graduating coloured layers are revealed).  I then dripped some turquoise royal icing on the top for a ‘drippy cake’ effect….. but that is definitely not obligatory.
  10. For photographing foodie pic purposes… It is best to slice this cake after it has been in the fridge for a couple of hours.  This will set the buttercream and mean that when the cake is sliced, each layer is clearly divided by the white buttercream.
  • I will confess that I am not a major fan of loads of food colouring in a cake, but I really really wanted to try this look. I gave some away to Alberto’s office, they loved it apparently, and my son Joseph also had a generous portion.  He has since informed me that his poo is blue!…… which he of course thinks is fabulous!!!  (insert eye roll emoji!)

layer17.jpg

Summer Pudding

Summer Pudding

This vintage recipe never goes out of date!  My English grandmother taught it to me on one of my many weekend sleepovers at her house when I was little.  Weekend sleepovers always included baking, although this recipe requires no baking at all! It’s that time 

Beautiful Sardegna (could have done without the food poisoning though)!

Beautiful Sardegna (could have done without the food poisoning though)!

Last weekend we went away for a long weekend to Sardegna, or Sardinia as it’s known in English.  I had never been before and was not disappointed.  It was one of those weekends that felt like we’d been away for 10 days, instead of the 

Cake Decorating

Cake Decorating

It’s a bit odd that I haven’t really posted many fondant decorated cakes on my blog. The truth is that I don’t decorate cakes as often as I once did, but if asked I am happy to pull out my rolling pin, cutters, gumpaste, ball tool and fondant!  For those of you who don’t know, I once had a television show on the Italian food channel, Gambero Rosso Channel.  Before that I was making many cakes for weddings and birthdays, and if you’d like to see some of my decorated cakes, you can visit my website.

Recently I made a ‘dummy’ wedding cake for a book launch.  Obviously the book was about a wedding.  A dummy cake means that the cake is not really cake.  They are loads of fun to do because you are decorating styrofoam/polystyrene.  It’s a little luxury sometimes to concentrate on the decoration without worrying about cake, fillings, and making it all perfect before you pull out the fondant.  I also made my favourite sugarpaste succulents and that slice of tree trunk you see there?, Well, that is also styrofoam with bark made from sugarpaste.  WEBSITE

Today though, I made a baptism cake for a baby girl.  While I certainly returned to the basics of cake decorating, I actually will always love the quilting look with blossoms for a cake.  I did make baby shoes for the first time from gumpaste though.  These were super easy.  I printed the template from the internet and watched a couple of ‘how to’ Youtube tutorials.

Collage

I have heard already that Caterina’s parents were very happy with the cake, so this means I can sleep peacefully.  Speaking of sleep, I better get myself to bed as I have a very exciting day of work tomorrow………….. But I’ll definitely tell you about that next time!

Bella Varenna – A little jewel on Lake Como

Bella Varenna – A little jewel on Lake Como

  I had the most wonderful weekend away.  It has taken me a few days to actually sit down and write about it, but arriving home on Sunday night threw me back into reality and I am convinced there really aren’t enough hours in the 

Lemon Poppy Seed Cake

Lemon Poppy Seed Cake

I’ve been thinking a lot lately of lemon desserts and felt that every blog should have a poppy seed cake recipe.  Today was a rather indulgent day in the kitchen, taking this very classic recipe and giving it quite a facelift!  I will confess that 

Baklava

Baklava

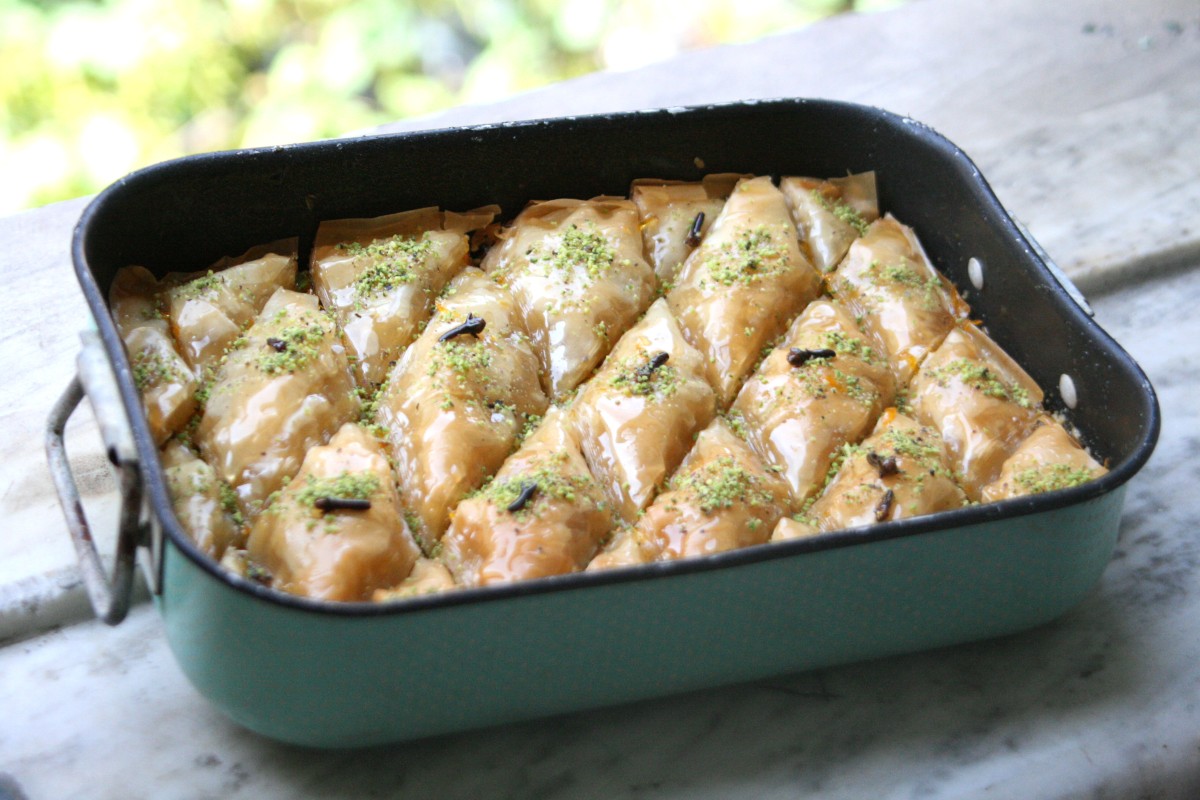
When I lived in an apartment as a student in North Melbourne, I remember buying Baklava from the Victoria Market. Although sickly sweet, I adore it and love the fine, delicate layers of filo pastry that are an integral part of this dessert.  The origins of Baklava are a bit confusing, with the Greeks and Turks both claiming it as their own.  It is characteristic of food from the former Ottoman Empire.  Suffice to say, the history of Baklava is as diverse as the number of ways it can be prepared and the types of nuts and syrup used often give you an idea as to the recipe’s origins.  My friend Anna said it perfectly when she said. “We are all connected in one way or another”.

I will be honest, I read a few recipes, and in the end combined two. I altered some measurements, and improvised when I was too lazy to go back to the supermarket.  I am really proud of how it turned out though, as it’s the first time I’ve ever tried to make it.

Baklava8

Baklava

  • 80g walnuts
  • 80g blanched whole almonds
  • 80g pistachio nuts
  • 80g unsalted peanuts (I added these when I realised I was a bit under weight with the nuts. Original recipe calls for 100g each of walnuts, almonds & Pistachio nuts).
  • 1/4 teaspoon ground cloves
  • 125ml honey
  • 200g sugar
  • 60ml lemon juice
  • 1/2 teaspoon cinnamon
  • 9 whole cloves
  • zest of one orange
  • 180ml water
  • 150g butter, melted
  • 2 packets store bought Filo Pastry.Baklava15
  1. Begin by making the syrup by adding to a saucepan the honey, sugar, lemon juice, cinnamon, whole cloves, orange zest and water.  Bring to a boil, and then allow to simmer for about 15 minutes.  (The syrup will reduce).  Leave to cool. (The syrup must be cool when it is poured over the baklava otherwise the pastry will go soggy.)
  2. In a food processor, whiz all nuts until finely chopped.
  3. Add nuts to a bowl, add ground cloves and mix well.
  4. Preheat oven to 160°C , fan forced.
  5. Brush the sides and base of a small baking tin (mine was about 18cm x 24cm) with the melted butter.  Open Filo Pastry and using the baking tray as a guide, cut around the Filo so that it will be the same size as the baking tray. Use a sharp knife!  Cover the Filo with a clean damp tea towel to prevent the pastry drying out.
  6. Work with 1 filo sheet at a time, and brush one side with butter, then place in the baking tray. Repeat to create 9 layers.  Scatter half of the nut mixture on top.
  7. Repeat layering 6 buttered Filo pastry sheets on top of the nuts. Scatter the remaining nuts on top, and continue with the buttered Filo Pastry sheets again.  I sort of lost count here, but I think I added another 9 layers. Brush the top generously with butter and place tray in the freezer for 10 minutes.
  8. Using a sharp knife, cut the Baclava into diamonds, ensuring your knife goes right down to the bottom of the baking tray.
  9. Place in oven, and bake for 35 minutes or until pastry is golden.
  10. Remove the baklava from the oven and carefully pour half the cooled syrup over the top. Leave for 5 minutes, then pour over the remaining syrup. Decorate by sprinkling with ground pistachio nuts.  Allow the baklava to cool before removing the pieces from the pan with a knife.  You might need to use the knife again just to ensure that each piece is sliced and separated well. Baklava can be kept in the tray and taken out for serving.  Covered in a cool, dry place, it will keep for up to a week……….If it lasts that long!


BAKLAVA

  • 80g di noci
  • 80g di mandorle intere
  • 80g di pistacchi
  • 80g di arachidi non salate (le ho aggiunte quando ho capito che ero un po’ sotto peso con le noci.  La ricetta originale richiede 100g di noci, mandorle e noci di pistacchi).
  • 1/4 di cucchiaino di chiodi di garofano macinati
  • 125ml di miele
  • 200g zucchero
  • 60ml di succo di limone
  • 1/2 cucchiaino di cannella
  • 9 chiodi di garofano
  • scorza di arancio
  • 180 ml di acqua
  • 50g di burro, fuso
  • 2 pacchetti di pasta Fillo 
  1. Iniziare facendo lo sciroppo ponendo in una pentola il miele, lo zucchero, il succo di limone, la cannella, tutti i chiodi di garofano, la scorza di arancia e l’acqua. Portare a bollire e poi lasciarlo sobbollire per circa 15 minuti. (Lo sciroppo si ridurrà). Lasciare raffreddare. (Lo sciroppo deve essere freddo quando viene versato sopra la baklava altrimenti la pasta filo non sarà croccante).
  2. In un robot di cucina, trittare tutti le noci finemente.
  3. Mettere le noci in una ciotola, aggiungere i chiodi di garofano macinati e mescolare bene.
  4. Preriscaldare il forno a 160 ° C. – forno ventilato.
  5. Con un pennello per pasticceria, spennellare i lati e la base di una piccola teglia da forno (la mia era circa 18cm x 24cm) con il burro fuso. 
  6. Aprire la pasta Fillo e utilizzando la teglia da forno come una guida, tagliare la pasta fillo in modo che sia della stessa dimensione della teglia di cottura.  Utilizzare un coltello affilato! Coprire la pasta fillo con un asciugamano pulito e umido per evitare che la pasta fillo si asciughi.
  7. Lavorare un foglio di Fillo alla volta e spennellare un lato con burro, quindi collocare nella teglia. Ripeti per creare 9 strati. 
  8. Mettere la metà della miscela di noci sulla superficie.
  9. Ripetere la stratificazione di 6 strati di pasta Fillo sopra le noci.  Aggiungere le noci rimanenti sulla parte superiore e continuare nuovamente con i fogli di pasta fillo, aggiungendo altri 9 strati.  Spennellare bene la parte superiore con il burro e posizionare la teglia nel congelatore per 10 minuti.
  10. Utilizzando un coltello tagliente, tagliare la Baklava in diamanti, assicurandosi che il coltello va giù fino in fondo alla teglia di cottura.
  11. Mettere in forno e cuocere per 35 minuti o finché la pasta Fillo è dorata.
  12. Rimuovere la baklava dal forno e versare con cura metà dello sciroppo raffreddato sopra la parte superiore. Lasciare per 5 minuti, quindi versare sopra lo sciroppo rimanente. Decorare la baklava a piacere.  Io ho usato i pistacchi macinati.
  13. Lasciare raffreddare la baklava prima di rimuovere i pezzi dalla teglia con un coltello. Potrebbe essere necessario utilizzare nuovamente il coltello solo per assicurare che ogni pezzo sia tagliato e separato bene. 

Baklava può durare fino a una settimana se mantenuta coperta in un luogo fresco e asciutto ………. Se qualcuno non se la mangia prima!

Melanzane alla Parmigiana

Melanzane alla Parmigiana

I have always loved eggplant cooked any which way, but this Italian classic is really one of my favourites.  (Running a very close second would have to be the way my mother crumbed slices with breadcrumbs and parmesan cheese, and then fried them).  Some people like